
Last year Gregor Suttie and Richard Hooper launched the Azure Advent Calendar and I got to support with a session on Azure Bastion. This year they improved on the idea with the Festive Tech Calendar. I’m happy to be back with an article on Azure VM best practices. I hope you find the article helpful and I would appreciate feedback.
Over the past few months, I have conducted many customer workshops, designed and implemented Landing Zones, and migrated or placed VMs into Azure. One of the most common customer questions has been about best practices for Azure VMs to maximize performance and efficiency, minimize costs, increase security, and reduce management overhead. This article is based on my real-world experience and recommendations based on several Azure projects.
The article is divided into different chapters. This makes the article more readable and gives me the possibility to add more articles.
Contents
Plan the Azure VMs sizing based on your needs
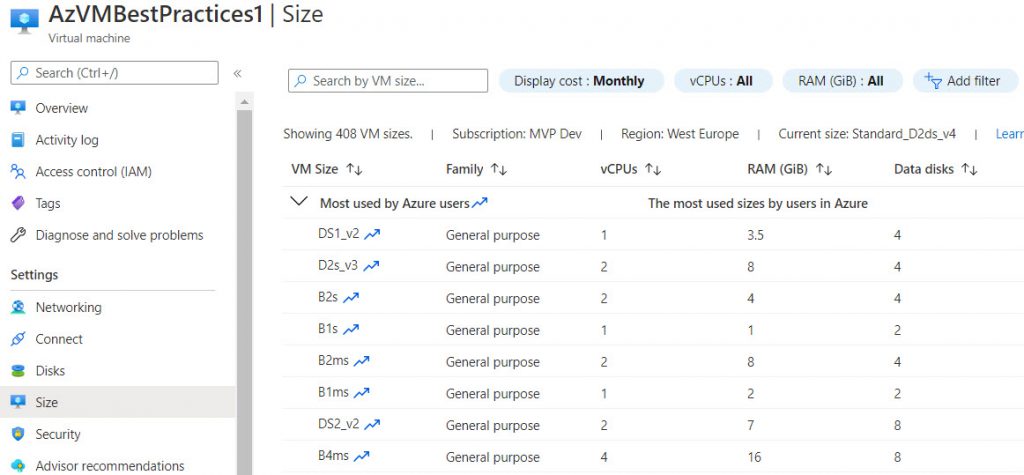
The start with Azure is challenging, because in general you start with a new Datacenter and this needs planning. So plan for Governance and design and implement a Landingzone for your plannend workloads. When it comes to use Azure VMs as a ressource for workloads, this needs planning. Why? In the backtime, we had a Cluster for running VMs and placed the VMs mostly with the same CPU, RAM and Disk settings in this cluster. The Cluster itself managed performance for the hole VM farm. In Azure we pay for every service that we deploy and this is good, because we decide about the performance and reliability of the service. In Azure, we should deploy a VM that provides the necessary performance for the workload at hand. That means a CPU and RAM utilization of 80% is absolutely welcome and should make us happy. If a VM needs less, a downgrade can be useful to save costs. We pay for the performance provided and our VM should actually use that performance, in contrast to before.
Enable automatic Start and Stop for VMs
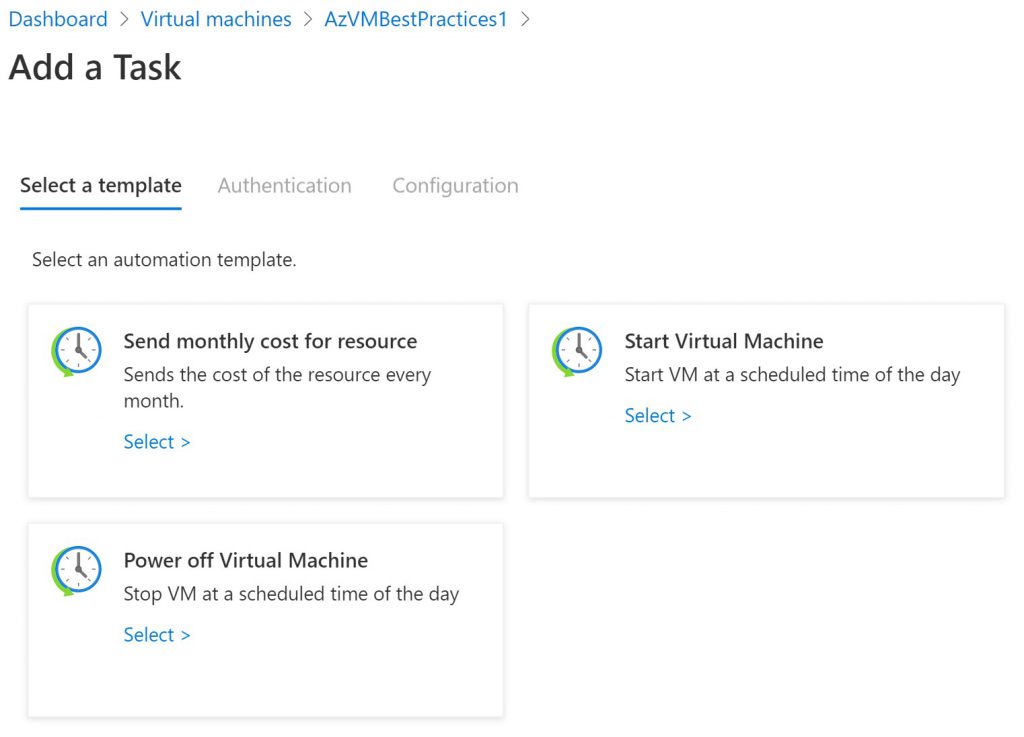
One of the advantages of the cloud is pay per use. Deploy a Azure VM needs planning and thinking about the use case. When deploy a Azure VM think about the use time and enable auto Start and Stop of the deployed VM based on the use case. A new solution to achive this in an easy way are Azure Tasks. Azure tasks based on Logic apps and give an easy was to enable Auto Start and Shutdown for the VMs.
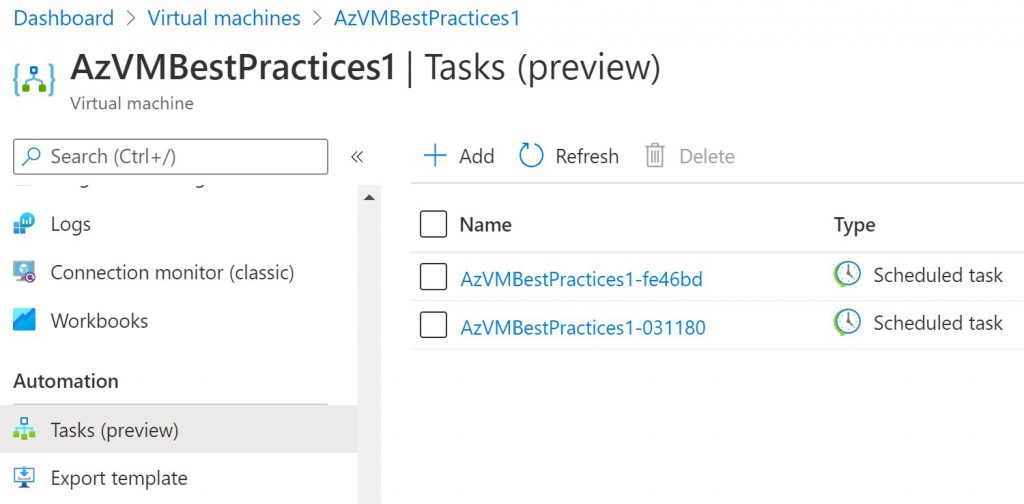
Azure tasks can be find on every Azure VM under Automation. It is easy to enroll and to configure. For a more automatic solution I prefer to use Azure Functions with Azure tags. In my environment I use Azure Functions in combinations with Tagging for a lot of recurring tasks.
Choose the right disk size and do not pay for unused disk space
In Azure, we pay for booked resources, which includes booked disk capacity. When deploying an Azure VM, only disk sizes based on the required capacity should be deployed. When deploying an Azure VM with Windows Server through the portal, the default OS disk size is 128 GB, but the actual disk space used is only about 20 GB. This means that we pay for more than 100 GB of unused capacity.
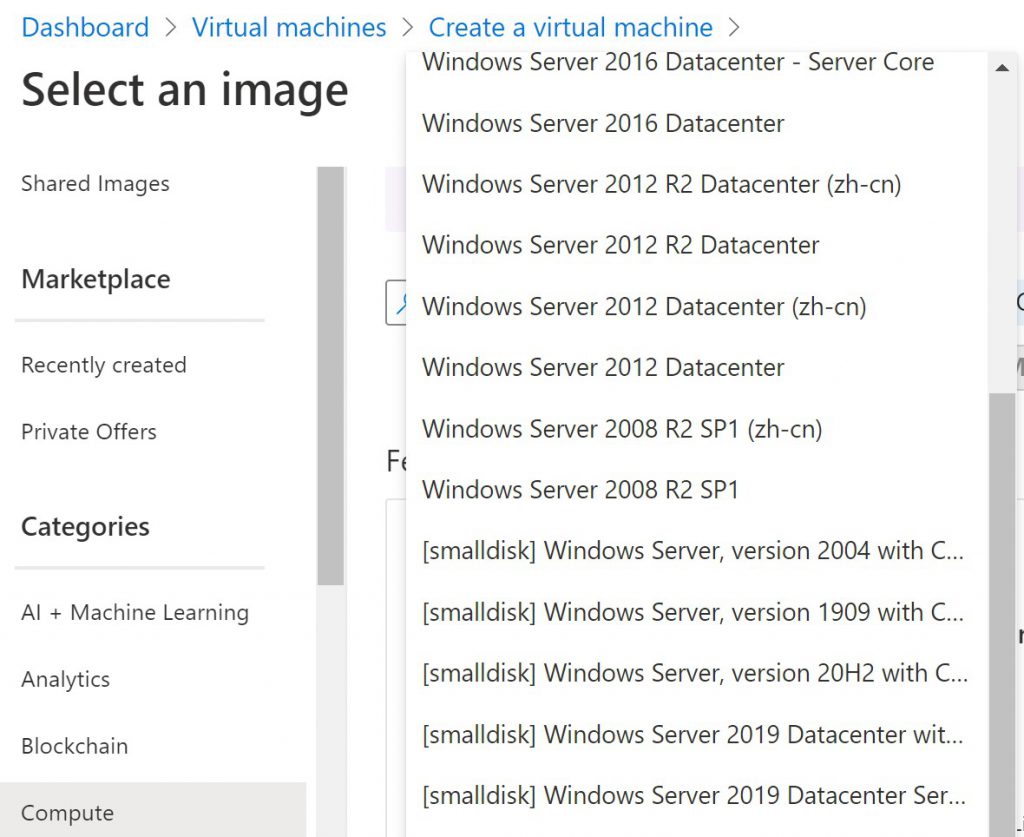
Over the portal there is an alternate Image for Windows Server available with [smalldisk] in the name. This image deploy an OS disk only with 30GB per default. The recommendation is also valid for software installation. Install additional software only on separated partition and define the needed size for the software installation and take an eye on needed IOPS and bandwith.
Avoid Management over Internet
Historically, I see an incredibly high number of Azure VMs including production workloads that had public IPs and their management ports (RDP/SSH) open for management purposes. Some customers were using an NSG, but that is only the last barrier that can protect the management port. Please avoid using public IP addresses for management purposes on Azure VMs. The VM is directly accessible to all kinds of Internet access including hackers, script kiddies and so on.
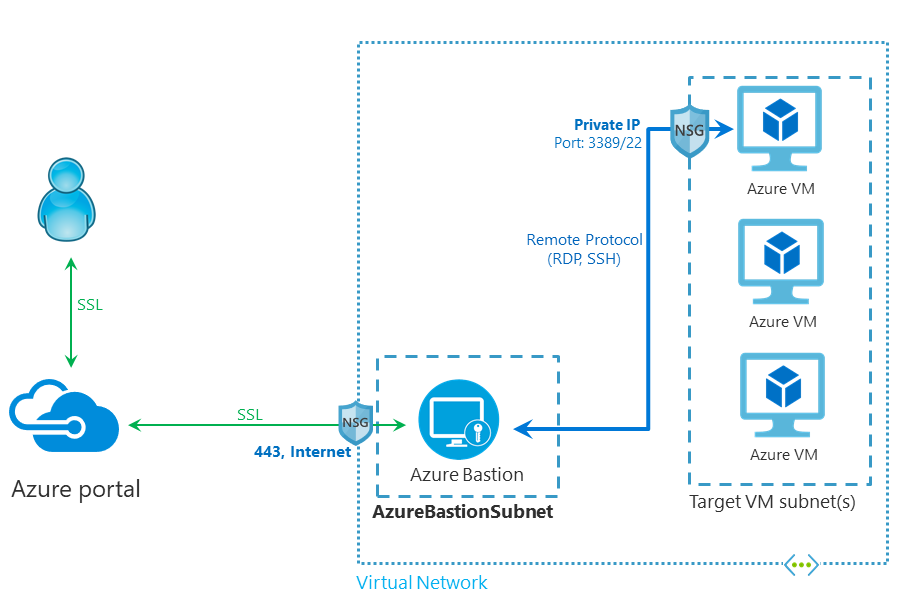
Use Azure Bastion to reach Azure VMs for management over the public Internet or directly use VPN connections inside the VNET for management purposes. Azure Bastion now supports VNET peering, this makes Azure Bastion more useable and cheaper, because now it is possible to enroll one Bastion and reach all VMs in the VNET including VMs in peered VNETs.
Plan for SLA and high availability
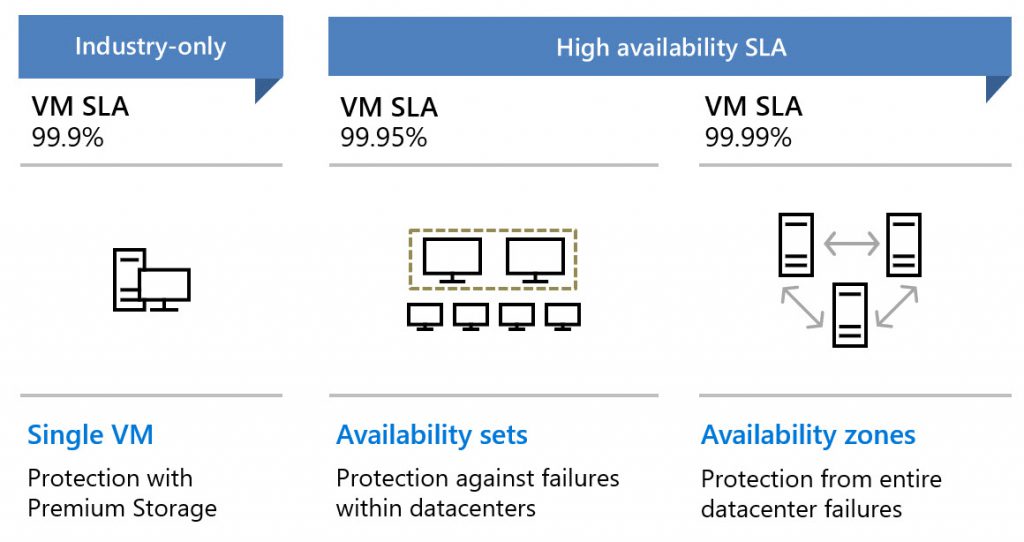
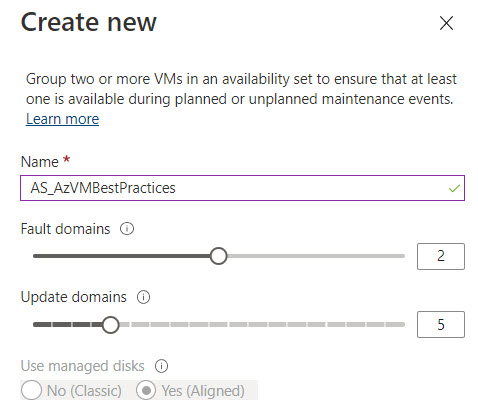
Whether an Azure VM receives an SLA depends on whether it is part of a group and the selected disk type. Whenever it is possible use Availability Sets or Availabilits Zones, because we get an better SLA and a lower probability of failure for our workloads.
When deploy a Single VM on Azure, they VM has only an SLA about 99,9% when using Premium SSDs for all disks. Without using Premium SSD for a Single VM we do not get an SLA and we risk a possible failure. Since July 2020, Microsoft has updated the SLA for VMs and now added SLAs for the disk type Standard HDD 95% and Standard SSD 99.5% (thanks for the Note Gertjan). I prefer to use at least standard SSDs for all workloads as they have a higher response time than standard HDDs and now also a much better SLA. For development environments or very cost conscious workloads, standard HDDs can still be an option.
Using Availability Sets or Zones is only possible when the workload support a group of VM and can handle the failure of individual VMs. The difference between Availability sets and zones are topic of this article.
Using public IP adresses on Azure VMs only via Load Balancer
The power of the cloud is the flexibility and scalability. Even if you start with a single VM or with an high number of VMs. When you deploy productions systems on VMs and they must reachable over the public Internet do not bound public IPs directly on the Azure VM NIC. Deploy a Load Balancer in front of the VM with an public IP and bound the VM NIC on the Load balancer . When using more than one VM it is quite easy to use the Load Balancer in front of the Availability Set or Zone group. This gives us the flexibility to change the VMs in the backend on the fly and secure the VM from Internet traffic.
Integrate any Azure VM into Azure Monitor
Azure Monitor is a great solution to monitor the Azure environment and get notified when things get wrong. It is a absolute must have for many things, like security reasons, monitoring or performance analytics. For any VM type in Azure there is a agent called Microsoft Monitoring Agent (MMA) available – the agent is same as for SCOM.
Create a central Log Analytic Workspace for all your VMs and get sure that every VM get the MMA installed by default. In some cases the development environment is not so important, but for production it is a necessary prerequisite.
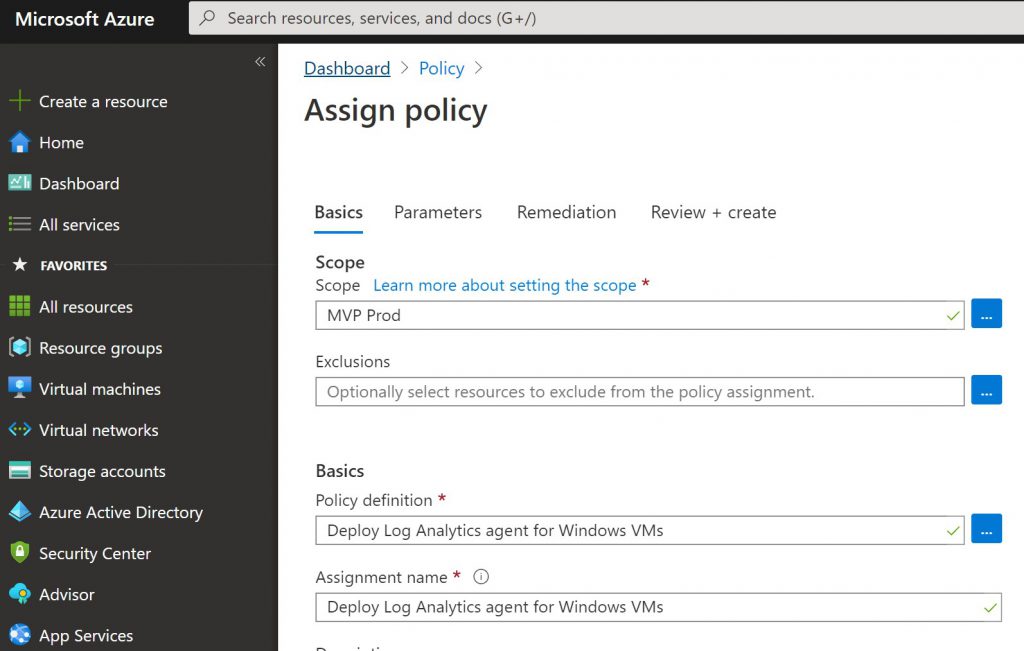
The best way to accomplish this is by using a Azure Policy and set the append setting for new or available VMs in the production subscription.
Enable Guest health feature in Azure Monitor for Azure VMs
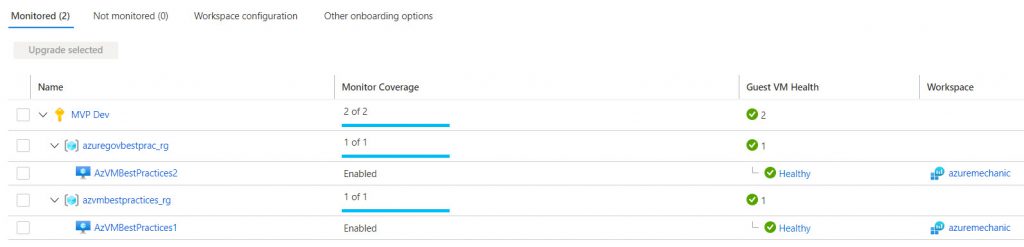
Since a few days Microsoft released a new feature for Azure Monitor. The Guest health feature in Azure Monitor enable the Monitoring of the health state of integrated VMs. With this feature it is possible to monitor the overall health state for the VM (for example CPU and RAM utilization, free Disk and more). When a trigger is generated it send an alarm to the
This feature is available for all Windows Servers 2012 and newer and Linux VMs based on Ubuntu 16.04 LTS and 18.04 LTS.
Integrate every Azure VM into Update Management and enable them

In this year I see an unbelivable high count of VMs they do not integrated in any Update mechanism. Some customers using Azure VMs with public IPs and do not enable Auto update management – this is highly critical. So integrate every Azure VM (no matter if Dev, Test or Prod VM) into Update management and enable Auto update or create an Update workflow for production critical workloads.
Use Azure Defender for production workloads
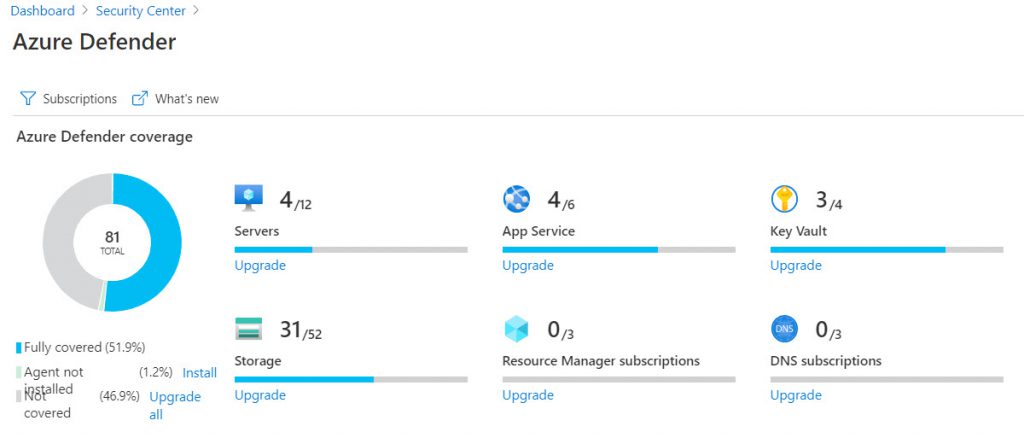
By default every newly created Azure Subscription are protected by Azure Security Center basic. Behind the scenes, the recommendations based on Azure Policy. The basic tier gives a really good overview about the Security posture for the environment and helpful recommendation to strengthen the security. It is best practice and a good recommendation to enable Azure Security Center Standard tier, now called Azure Defender, for all production workloads. This helps to improve the security for production workloads and prevent critical workloads by Azure Defender’s integrated vulnerability assessment solution.
Azure Automanage
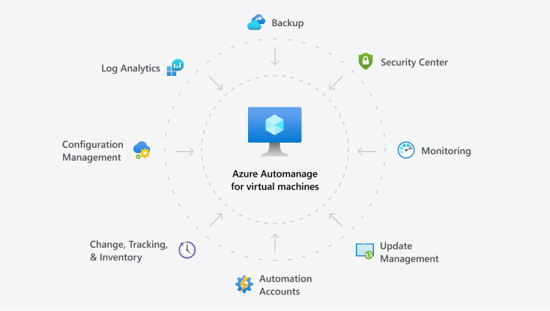
This article covers a lot of best practices for Azure VMs, but all the steps needs to be done manualy or the best case is to enable and configure Azure Policy and Automation to keep all VMs up to date. Microsoft released a new solution called Azure Automanage on the last MS Ignite. Azure Automanage enable the best practices and recommendation from Microsoft for a lot of services, like Backup, Monitoring, Update Management, Security and more on selected VMs. But it is not replace planning, correct sizing, performance recommendations. When you do not had any management in place right now, I can really recommend to use Azure Automanage for the first step to get a better management of the environment.
Links
- Azure Bastion – Secure access Azure VMs without public IPs
- Difference between Availability Set and Zone
- Microsoft Docs – Azure Monitor for VMs guest health
- Microsoft Docs – Create automation tasks to manage Azure ressources
- Microsoft Docs – Azure Automanage documentation
- Microsoft Docs – Azure Updatemanagement overview
- Microsoft Docs – Azure Defender landing page
- Microsoft SLA Level for Azure Virtual Machines
Hi Gregor, nice article! Just one remark. Even with Standard SSD and Standard HDD, you’ll get a SLA nowadays for your VM. It is not very high, but it’s there. See https://azure.microsoft.com/en-us/support/legal/sla/virtual-machines/v1_9/. Cheers!
Hi Gertjan,
thanks for the great tip, I have updated the article with this information.
Thanks again 🙂
Gregor
I have one doubt on below mentioned point, please share you suggestion on this.
“””Using public IP addresses on Azure VMs only via Load Balancer””
=> Ideally Azure loadbalancer doesn’t do any content filtering, how will it be helpful if we have only single backend VM?
=> LB with public IP and single backend VM and direct public IP on VM is almost same?
Hi Madhu,
when you assign a PIP direct to the VM, you can see with some Portscanner, that an VM is assigned to the PIP. When you using a Loadbalancer you can avoid this.
Greetings
Gregor